- How often does my site publish?
The following table shows the publish and transfer schedule of the main channels.
The publish time is the time you need to have approved your changes by, in order to make that publish cycle.
The transfer time is the time, later in the same publish cycle, when the approved changes will transfer and appear on the live site.
Channel Name Publish Time Transfer Time Home :12 Hourly (10:12, 11:12) :40 Hourly (10:40, 11:40). Schools :22 Every 2 Hours (11:22, 13:22) :55 Every 2 Hours (11:55, 13:55) Directorates :30 Every 2 Hours (10.30, 12.30) :05 Every 2 Hours (11:05, 13:05) Research Centres :52 Every 2 Hours (11:52, 13:52) :25 Every 2 Hours (12:25, 14:25) Sites :35 Hourly (10:35, 11:35) :15 Hourly (11:15, 12:15) Events :01 Every 2 Hours (10:01, 12:01) :45 Every 2 Hours (10:45, 12:45) Elearning 01:55 Once Daily :28 Once Daily (02:28) China :50 Every 2 Hours (10:50, 12:50) :08 Every 2 Hours (11:08, 13:08)
Share
Publishing
- How do I set a Publish Date and Time?
For each piece of content on your website, the CMS offers you the option to set a specific date and time for that content to be published live. For example, you can prepare content a few weeks or days in advance, planning its future release to the live site by creating the content, setting the required publish date and time options and then approving the content.
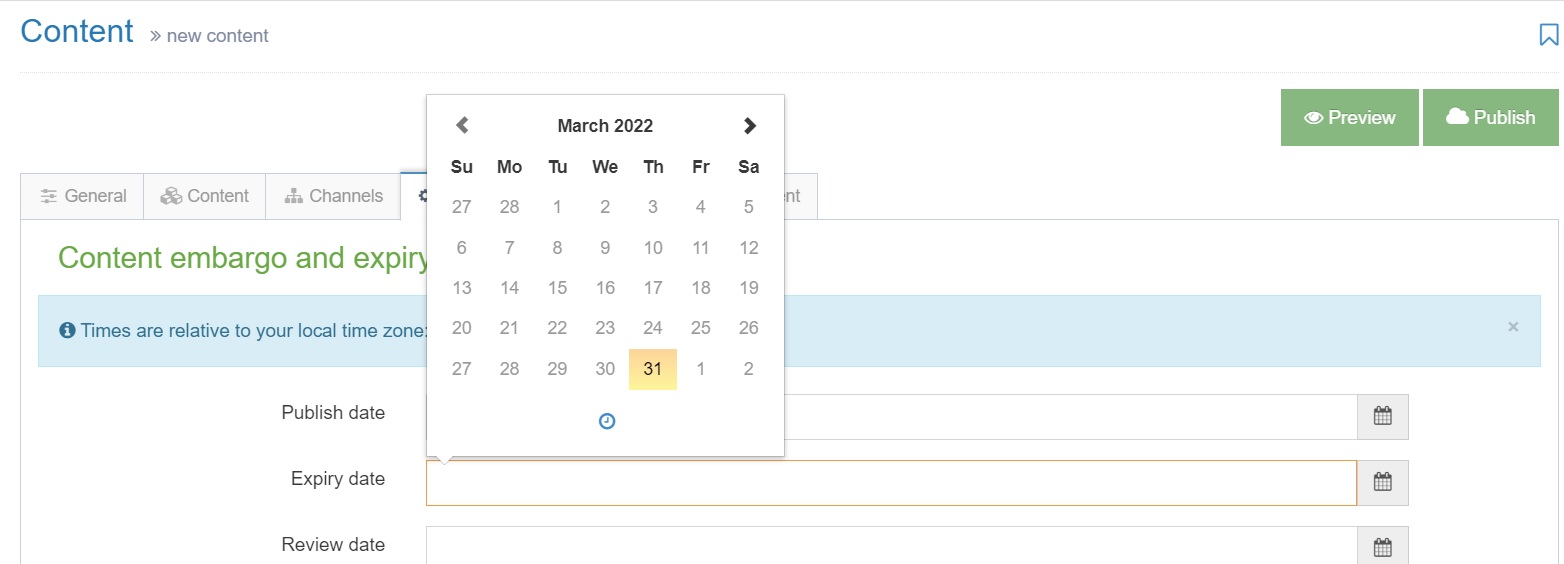
- Open the piece of content.
- Click on the Options tab.
- Click in the Publish date field. Today's date and time will automatically be displayed and selected.
- Alter the date and time as required.
- Update and Approve the piece of content.
Make sure you set the publish time to be at least two hours before it needs to go live. Do not set the publish time for exactly when you want the content to go live. There is no way to precisely publish a piece of content for a specific time - you have to work within the scheduled publish cycles.
For example, if you want a piece of content in the Schools channel to go live at 1pm, you need to set the publish time to be approx two hours previous to this - 11am. This is because the Schools channel publishes every two hours at 22 minutes past the hour, so you are aiming for the content to catch the 11:22am publish cycle. The content will then publish to the live site at approx noon.
Other channels, such as Research Centres, publish at different times. View the full list of scheduled publish cycles.
Share
- How do I shorten my URL?There are a number of options to shorten your URL. These are:
- Output URI field
- QUB GO Short URL Service
- URL Redirect
1. Output URI fieldBy default, the CMS will publish out URL's based on section names. So, if you have a really long section name, your URL will be impacted by that.
To combat this, the CMS has an Output URI field for each section.This field allows you to create a smaller URL.A good example is the URL https://www.qub.ac.uk/alumni/. The full Alumni section name is 'Development and Alumni Relations Office' but it has an Output URI which has shortened the URL from 'Development and Alumni Relations Office' to 'alumni'.It is important to note that it is best to add an Output URI when you are first creating a new section. You can add an Output URI at any time, but adding an Output URI to shorten the URL on a section that has been live for a while will affect any Google links, external links or bookmarks pointing to the old URL.Tip: The current recommended format when entering a value into the Output URI field is to use hyphens to separate words, and to use lowercase. For example, 'My Section Title', would be written in the Output URI field as 'my-section-title'. This format has benefits for readability and for Search Engine results/rankings.2. QUB GO Short URL ServicePlease note that this is not a CMS service. This service is at the discretion of the service operators.Accessing the serviceYou can access the QUB GO service at http://go.qub.ac.uk.Important: Please make sure you are on the QUB VPN or using a QUB networked machine to access. Also, make sure you use your staff credentials to login). This service allows you to create short URL's.Example Short URL: http://go.qub.ac.uk/my-short-url3. URL RedirectPlease note that this is not a CMS service. This service is at the discretion of the service operators.A URL redirect requires the involvement of the Web Infrastructure team to create a redirect that points to your web page. You can contact them via the Site Help Desk ticketing system.You would need to discuss your short URL and other options with the Web Infrastructure team before this.Share
- How do I remove content from the live site?
How do I remove content from the live site?
You can remove a piece of content from the live web page in two ways:
- Expire content
- Delete content
Expire Content
Expiring content means you apply a date and time to the individual piece of content using the Options tab. Once this date and time are reached, the content is removed from the live web page but it is retained within the CMS site structure with an Expired status. You can choose to publish the piece of content again at a later date if required.
To expire content:
- Open the piece of content
- Click the Options tab
- Click in the Expiry Date field
- By default, today's date and nearest time are selected (you can change this to set a different date and time, as required).
- Click Save and Approve

Delete Content
Deleting content means you are permanently removing the piece of content from both the live site and the CMS itself. When you delete a piece of content from your site structure, its status changes to Inactive and it moves to the system recycle bin. In the next publishing cycle, the deleted piece of content will be removed from the live site. The recycle bin is purged every week (usually on a Friday) and the inactive content is permanently deleted from the CMS.
- In the Site Structure screen, click on the section containing the piece of content you want to delete.
- Click on the Contents tab.
- Click the Actions menu beside the piece of content you want to delete.
- Click Delete.
- Confirm the deletion.
The status of the piece of content is now set to Inactive.
Share
- How do I remove a web page from the live site?
How do I remove a web page from the live site?
You can remove a web page (section) from the live site in two ways:
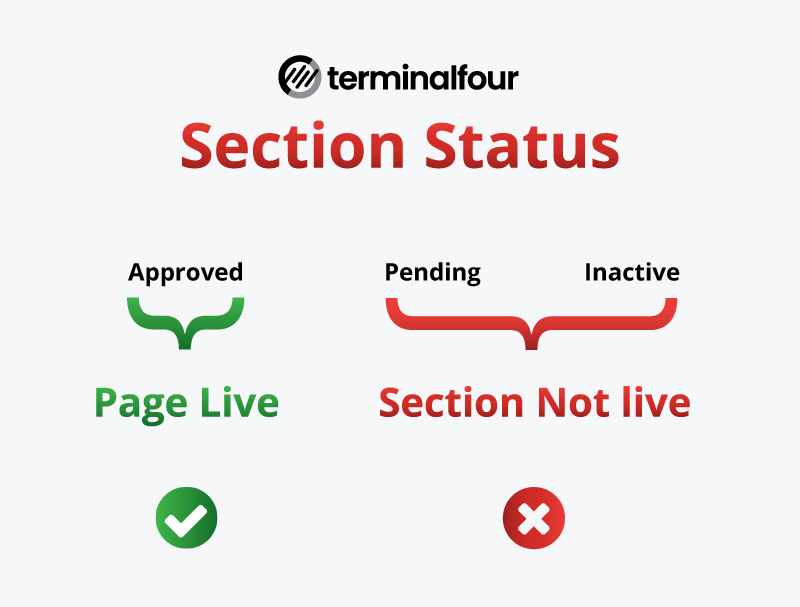
- Set the status of the page to Pending
- Set the status of the page to Inactive
Set the Status to Pending
Setting the status of a web page to pending means it will be removed from the live site but it is retained within the CMS site structure. You can choose to publish the page again at a later date if required by changing its status from Pending back to Approved.
Once the status has been changed to Pending, the page will be removed from the live site in the next publishing cycle.
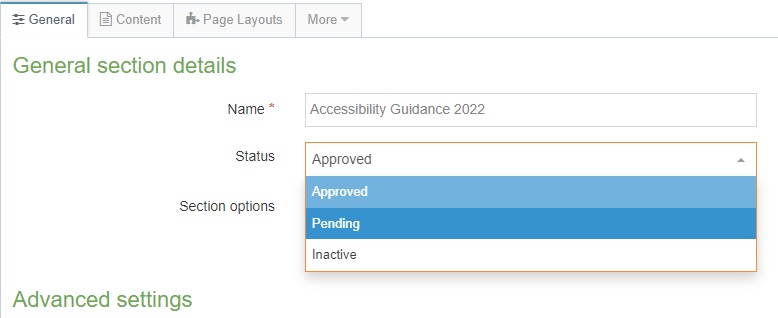
- In your Site Structure screen, click on the section name
- The properties of the section under the general tab are displayed. In the Status drop-down options, click Pending.
- Click Save Changes.
Set the Status to Inactive
This means you are deleting and permanently removing the section from both the live site and the CMS itself. When you delete a section from your site structure, its status changes to Inactive and it moves to the system recycle bin. In the next publishing cycle, the deleted section will be removed from the live site. The recycle bin is purged every week (usually on a Friday) and the inactive section is permanently deleted from the CMS.
- Click the Actions menu beside the section you want to delete.
- Click Delete Section
- Confirm the deletion
The status of the section is now set to Inactive.
Section Status Infographic showing that Approved sections go live, Pending and Inactive do not go live.
Share